Indulge in the joy of crafting your own Vegan White Chocolate Easter Eggs with Pascha's Organic Vegan White Baking Chips. This delightful, dairy-free recipe is perfect for festive occasions and offers a fun, customizable treat for all ages.
Techniques Used:
- Melting the Chocolate: Utilizing a double boiler over medium-low heat ensures gentle melting of the Pascha Vegan White Baking Chips. Stirring continuously prevents scorching and achieves a smooth, creamy consistency.
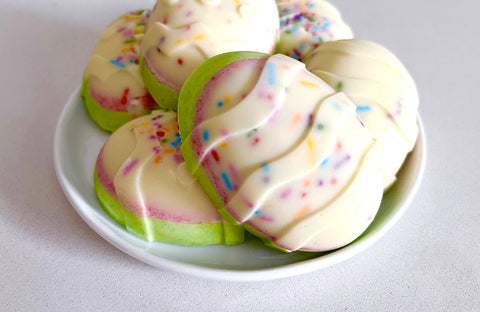
- Layering and Coloring: The recipe involves creating multiple layers of chocolate, each potentially dyed with vegan food coloring. By allowing each layer to set in the refrigerator before adding the next, you achieve a visually appealing, multi-colored effect.
- Mold Setting: Pouring the melted chocolate into egg-shaped silicone molds, prepped with sprinkles or other decorations, and refrigerating them ensures the chocolate hardens properly, capturing the desired shape and design.
Why You'll Love This Recipe:
- Dietary-Friendly: Crafted with Pascha's Organic Vegan White Baking Chips, these Easter eggs are dairy-free and suitable for those following a plant-based diet.
- Customizable: With the ability to add various vegan dyes and sprinkles, you can personalize each egg to match your festive theme or personal preferences.
- Simple and Fun: The straightforward techniques make this recipe accessible, providing an enjoyable activity for families and individuals alike.
Embrace the festive spirit by creating these delectable Vegan White Chocolate Easter Eggs, combining the rich taste of Pascha's chocolate with your creative flair.
Ingredients:
- 3 cups Pascha Organic Vegan White Baking Chips
- Vegan Dyes
- Sprinkles
- Egg Mold
Directions:
- Melt Pascha Vegan White Chocolate Chips in a double boiler over medium-low heat.
- Do this in 3 batches of about 1 cups of chips at a time.
- Once chocolate starts to melt fold over once.
- As melting continues begin to stir constantly until almost melted.
- Turn off heat for final melting continuing to stir.
- Set chocolate aside for a minute.
- Place mold on a cookie sheet.
- Add sprinkles to base of mold.
- Pour chocolate in mold about 1/3 of the way.
- Place in refrigerator for 15 minutes.
- Take another cup of chocolate and melt same as above.
- Pour into container and add desired dye color stirring until blended.
- Remove mold from refrigerator and pour another 1/3 on top.
- Place back in the refrigerator as above.
- Continue doing another round using a desired color.
- Once all 3 colors are done place in refrigerator for 2 hours to get completely hard.
- Store in container & enjoy!
Music by Stockaudios Stockaudios