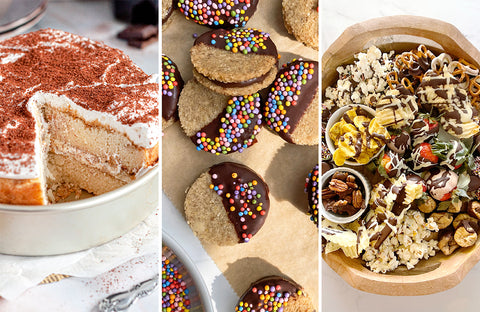
Vegan & Gluten-Free Tiramisu Cake
Prep: 60 Minutes
Bake: 30 Minutes
Yield: 1 Cake (14 slices)
Ingredients
Cake:
- 2/3 cup Vegan Butter
- 1-1/4 cup Organic Cane Sugar
- 1/2 cup Vegan Sour Cream, Room Temperature*
- 1 tsp Pure Vanilla Extract
- 2 cups Gluten-Free Baking Blend
- 2 tsp Baking Powder
- 1 tsp Fine Sea Salt
- 1/2 tsp Baking Soda
- 1/2 tsp Xantham Gum (Omit if GF Flour Blend has It)
- 3/4 cup Vegan Milk, Room Temperature
- 1/2 - 1 cup Espresso or Strongly Brewed Coffee, Room Temperature
- 1 bar Pascha 70% Cacao Organic Dark Chocolate with Arabica Coffee
Coconut Whip Cream:
- 2 cans Coconut Cream, well-chilled (see step 10)
- 1/4 cup Icing Sugar (optional)
- 1 tsp White Vinegar
Directions
- Preheat the oven to 350ºF and prepare two 8 inch round cake pans with non-stick baking spray and parchment paper.
- In the bowl of a stand mixer and with the flat beater attachment, cream the butter and sugar on high for 5 minutes.
- Add in the sour cream and vanilla extract and mix on high for another 2 minutes.
- Add in the flour, baking powder, salt, baking soda, and xanthan gum and turn the mixer on low.
- As the mixer is on low, slowly pour in the milk and allow the batter to mix until just combined. Be careful to not overmix the batter. Scrape the sides of the bowl when necessary.
- Divide the cake batter evenly into the two prepared cake pans and bake for approximately 25-30 minutes or until a toothpick inserted in the center comes out with a few moist crumbs and the cake edges begin to pull away from the cake pans.
- Allow the cake layers to cool for 10 minutes and then invert them on a cooling rack to fully cool.
- Place the fully cooled cake layers back into the cake pans and with a fork, skewer, or knife poke holes all over the top of both cake layers.
- Depending on how strong of a coffee flavor you desire, evenly pour ¼ - ½ cup of espresso or strongly brewed coffee over each cake layer and allow to soak in. Set the cake layers aside as you prepare the coconut whip cream.
- Chill the canned coconut cream overnight in the fridge. This is crucial to making fluffy coconut whip cream. Do not shake the can to mix. A well-chilled bowl and beater will also help.
- Chill the canned coconut cream overnight in the fridge. This is crucial to making fluffy coconut whip cream. Do not shake the can to mix. A well-chilled bowl and beater will also help.
- Add in the icing sugar (optional) and white vinegar and mix on high until smooth and fluffy. This should only take approximately 1-2 minutes. Scrape down the sides of the bowl when necessary. Over-whipping will cause the coconut cream to revert back to liquid.
- Use the coconut whip cream right away or immediately place in the refrigerator.
- Top one layer of coffee soaked cake with half of the coconut whip cream and spread evenly to the edges of the cake.
- Top the coconut whip cream with a healthy dose of Pascha 70% Cacao Organic Dark Chocolate with Arabica Coffee Bar shavings.
- Remove the remaining cake layer from the pan and gently place on top. Repeat steps 14 and 15.
- Slice and serve immediately or place in the refrigerator. Enjoy!
- Leftover cake slices should be stored in an airtight container in the refrigerator for up to 4 days.
*Plain or vanilla vegan yogurt can be used in place of the vegan sour cream.
Recipe, Photo’s and Video by @cakedbykatie
Music credit - Breeze by MBB
Vegan & Paleo Mini Chocolate Sandwich Cookies
Yield: About 28 Sandwich Cookies
Ingredients:
Cookies
- 1¼ cup Blanched Almond Flour
- 3 tbsp Monk Fruit Sweetener or Coconut Sugar
- 1 tbsp Ground Flax
- ⅛ tsp Salt
- 3 tbsp Melted Coconut Oil
- 1 tbsp Water
- 1 tsp Vanilla Extract
Filling
- 3 tbsp Pascha Dark Chocolate Chips(we used our Pascha 70% Stevia Chips)
- 3 tbsp Sunflower Seed Butter
Coating
- ¼ cup Pascha Dark Chocolate Chips (we used our Pascha 70% Stevia Chips)
- Optional: Sprinkles
Instructions
- Preheat the oven to 350°F degrees F.
- Combine almond flour, monk fruit sweetener, ground flax and salt.
- Mix in coconut oil, water and vanilla with a spatula, then use your hands to combine the dough.
- Roll cookie dough between 2 sheets of parchment paper to about 1/8"-1/4" thick.
- Use a small circular cookie cutter to cut out cookie shapes. Transfer the shapes to a parchment-lined baking sheet.
- Bake the cookies in the preheated oven at 350 degrees for 8-9 minutes.
- Remove cookies from the oven, cool for 5 minutes on a baking sheet, then transfer to a wire cooling rack.
- Melt chocolate for the filling, then mix in sunflower seed butter.
- Pour mixture into a plastic bag, cut a small hole in one end and pipe the chocolate filling onto half the cookies*.
- Place another cookie on top of the frosted ones to create a "sandwich”.
- Freeze the sandwich cookies for 10 minutes to set.
- Melt the dark chocolate for the coating.
- Dip the frozen cookies half way into the melted chocolate and top with sprinkles.
*Notes:
If the chocolate filling is too runny, let it sit for 5-10 minutes to thicken.
If the filling becomes too hard, run the baggie under warm water to re-melt the chocolate.
Recipe by @bakeit.paleo
Sweet & Savory Vegan Pascha White & Dark Chocolate Charcuterie
Serves: 15+
The best part about a charcuterie board is your imagination is the guide. Detailed below are what we have done in the Pascha Kitchen tapping our favorite sweet & savory items. The sky is the limit here and we simply offer this as a starting point. Or just follow the recipe to the letter because honestly each bite is a huge YUM in your mouth.
Ingredients
- Pascha Chocolate Organic Vegan White Bar
- Pascha Chocolate 100% Cacao Organic Vegan Dark Chocolate Bar
- Popcorn (We like @lesserevilsnacks)
- Organic Strawberries
- Organic Pecan Halves
- Organic Plantain Chips (We like @Barnana)
- Vegan Marshmallows (We like @mydandies)
- Cauliflower Pretzel Twists (We like @fromthegroundupsnacks)
- Avocado Oil Classic Chips (We like @bouldercanyon)
- Organic Figs
- Plant-Based Sprinkles (We like @watkins.1868)
- Caramel Infused Sugar (We like @balancedbites)
Directions:
- Using a double boiler, melt your chocolates over medium heat, stirring occasionally until melted.
- Remove from heat and either drizzle or dip your items into the melted chocolate.
- If adding sprinkles apply immediately after chocolate and allow to set.
- For marshmallows, place in the refrigerator to harden.
- Once strawberries are dipped in chocolate, place in the refrigerator for about 15 minutes before adding another chocolate drizzle.
- Sprinkle nuts & plantains with infused sugar once chocolate is drizzled and allowed to set.
- Decorate your board using smaller bowls if you like. Make it have a style that is you. Most importantly have FUN! and Enjoy!
Music credit - Breeze by MBB


